Cloud SQL for PostgreSQL and AlloyDB for PostgreSQL now support the pgvector extension, bringing the power of vector search operations to PostgreSQL databases. You can read the full announcement here.
In this step-by-step tutorial, we will show you how to add generative AI features to your own applications with just a few lines of code using pgvector, LangChain and LLMs on Google Cloud. You can also follow along with our guided tutorial video. We’ll build a sample Python application that can understand and respond to human language queries about the data stored in your PostgreSQL database. Then, we’ll further push the creative limits of the application by teaching it to create new AI-generated product descriptions based on our existing dataset about children’s toys. Forget about boring “orange and white cat stuffed animal” descriptions of days past — with AI, you can now generate descriptions like “ferocious and cuddly companion to keep your little one company, from crib to pre-school”. Let’s see what our AI-generated taglines can do!
How to install pgvector in Cloud SQL and AlloyDB for PostgreSQL
The pgvector extension can be installed within an existing instance of Cloud SQL for PostgreSQL and AlloyDB for PostgreSQL using the CREATE EXTENSION command as shown below. If you do not have an existing instance, create one for Cloud SQL and AlloyDB.
- code_block
- [StructValue([(u’code’, u’postgres=> CREATE EXTENSION IF NOT EXISTS vector;rnCREATE EXTENSION’), (u’language’, u”), (u’caption’, <wagtail.wagtailcore.rich_text.RichText object at 0x3e9b3df6a4d0>)])]
The new `vector` data type
Under the hood, the pgvector extension uses the PostgreSQL `CREATE TYPE` command to register a new data type called `vector`. PostgreSQL table columns can be defined using this new `vector` data type. A string with comma-separated numbers within square brackets can be used to insert values into this column as shown below.
The following code snippet uses a three-dimensional vector as an example. In actual AI/ML applications, a vector has many more dimensions, typically in the order of hundreds.
- code_block
- [StructValue([(u’code’, u”postgres=> CREATE TABLE embeddings(rn id INTEGER,rn embedding vector(3)rn);rnCREATE TABLErnrnrnpostgres=> INSERT INTO embeddings rn VALUESrn (1, ‘[1, 0, -1]’),rn (2, ‘[1, 1, 1]’),rn (3, ‘[1, 1, 50]’);rnINSERT 0 3″), (u’language’, u”), (u’caption’, <wagtail.wagtailcore.rich_text.RichText object at 0x3e9b3df6a810>)])]
New similarity search operators in pgvector
The pgvector extension also introduces new operators for performing similarity matches on vectors, allowing you to find vectors that are semantically similar. Two such operators are:
- ‘<->’: returns the Euclidean distance between the two vectors. Euclidean distance is a good choice for applications where the magnitude of the vectors is important — for example, in mapping and navigation applications, or when implementing the K-means clustering algorithm in machine learning.
- ‘<=>’: returns the cosine distance between the two vectors. Cosine similarity is a good choice for applications where the direction of the vectors is important — for example, when trying to find the most similar document to a given document for implementing recommendation systems or natural language processing tasks.
We use the cosine similarity search operator for our sample application.
Building the sample application
Let’s get started with building our application with pgvector and LLMs. We’ll also use LangChain, which is an open-source framework that provides several pre-built components that make it easier to create complex applications using LLMs.
The entire application is available as an interactive Google Colab notebook for Cloud SQL PostgreSQL. You can directly run this sample application from your web browser without any additional installations, or writing a single line of code!
Follow the instructions in the Colab notebook to set up your environment. Note that if an instance with the required name does not exist, the notebook creates a Cloud SQL PostgreSQL instance for you. Running the notebook may incur Google Cloud charges. You may be eligible for a free trial that gets you credits for these costs.
Loading our ‘toy’ dataset
The sample application uses an example of an e-commerce company that runs an online marketplace for buying and selling children’s toys. The dataset for this notebook has been sampled and created from a larger public retail dataset available at Kaggle. The dataset used in this notebook has only about 800 toy products, while the public dataset has over 370,000 products in different categories.
After you set up the environment using the steps mentioned in the Colab notebook, load the provided sample dataset into a Pandas data frame. The first five rows of the dataset are shown for your reference below.
- code_block
- [StructValue([(u’code’, u”import pandas as pdrnrn# Download and save the dataset in a Pandas dataframe.rnDATASET_URL=’https://github.com/GoogleCloudPlatform/python-docs-samples/raw/main/cloud-sql/postgres/pgvector/data/retail_toy_dataset.csv’rndf = pd.read_csv(DATASET_URL)rndf = df.loc[:, [‘product_id’, ‘product_name’, ‘description’, ‘list_price’]]rndf.head(5)”), (u’language’, u’lang-py’), (u’caption’, <wagtail.wagtailcore.rich_text.RichText object at 0x3e9b3df6aa10>)])]

Save the dataset in a PostgreSQL table called `products` that has a simple schema with four fields: product_id, product_name, description, and list_price.
- code_block
- [StructValue([(u’code’, u’# Save the Pandas dataframe in a PostgreSQL table.rnimport asynciornimport asyncpgrnfrom google.cloud.sql.connector import Connectorrnrnasync def main():rn loop = asyncio.get_running_loop()rn async with Connector(loop=loop) as connector:rn # Create connection to Cloud SQL databasern conn: asyncpg.Connection = await connector.connect_async(rn f”{project_id}:{region}:{instance_name}”, # Cloud SQL instance connection namern “asyncpg”,rn user=f”{database_user}”,rn password=f”{database_password}”,rn db=f”{database_name}”rn )rnrn # Create the `products` table.t rn await conn.execute(“””CREATE TABLE products(rn product_id VARCHAR(1024) PRIMARY KEY,rn product_name TEXT,rn description TEXT,rn list_price NUMERIC)”””)rnrn # Copy the dataframe to the `products` table.rn tuples = list(df.itertuples(index=False))rn await conn.copy_records_to_table(‘products’, records=tuples, columns=list(df), timeout=10)rn await conn.close()rnrnrn# Run the SQL commands now.rnawait main() # type: ignore’), (u’language’, u’lang-py’), (u’caption’, <wagtail.wagtailcore.rich_text.RichText object at 0x3e9b3df6a590>)])]
Generating the vector embeddings using Vertex AI
We use the Vertex AI Text Embedding model to generate the vector embeddings for the text that describes various toys in our products table. At publication, the Vertex AI Text Embedding model only accepts 3,072 input tokens in a single API request. Therefore, as a first step, split long product descriptions into smaller chunks of 500 characters each.
Split long text into smaller chunks with LangChain
You can use the RecursiveCharacterTextSplitter method from LangChain library, which provides a nice and simple way to split the large text into smaller chunks.
- code_block
- [StructValue([(u’code’, u’from langchain.text_splitter import RecursiveCharacterTextSplitterrnrntext_splitter = RecursiveCharacterTextSplitter(rn separators = [“.”, “\n”],rn chunk_size = 500,rn chunk_overlap = 0,rn length_function = len,rn)rnchunked = []rnfor index, row in df.iterrows():rn product_id = row[‘product_id’]rn desc = row[‘description’]rn splits = text_splitter.create_documents([desc])rn for s in splits:rn r = { ‘product_id’: product_id, ‘content’: s.page_content }rn chunked.append(r)’), (u’language’, u’lang-py’), (u’caption’, <wagtail.wagtailcore.rich_text.RichText object at 0x3e9b3eaaae90>)])]
Get the vector embeddings using Vertex AI
After you split long product descriptions into smaller chunks, you can generate vector embeddings for each chunk by using the Text Embedding Model available through Vertex AI. Notice how we can accomplish this in just a few lines of code!
- code_block
- [StructValue([(u’code’, u’from langchain.embeddings import VertexAIEmbeddingsrnfrom google.cloud import aiplatformrnrnaiplatform.init(project=f”{project_id}”, location=f”{region}”)rnembeddings_service = VertexAIEmbeddings()rnrnbatch_size = 5rnfor i in range(0, len(chunked), batch_size):rn request = [x[‘content’] for x in chunked[i: i + batch_size]]rn response = embeddings_service.embed_documents(request)rn # Post-process the generated embeddings.rn # …’), (u’language’, u’lang-py’), (u’caption’, <wagtail.wagtailcore.rich_text.RichText object at 0x3e9b3eaaa190>)])]
Use pgvector to store the generate embeddings
After creating the pgvector extension and registering a new vector data type, you can store a NumPy array directly into a PostgreSQL table.
- code_block
- [StructValue([(u’code’, u’from pgvector.asyncpg import register_vectorrnrn# …rnawait conn.execute(“CREATE EXTENSION IF NOT EXISTS vector”)rnawait register_vector(conn)rnrnrn# Create the `product_embeddings` table to store vector embeddings.rnawait conn.execute(“””CREATE TABLE product_embeddings(rn product_id VARCHAR(1024), rn content TEXT,rn embedding vector(768))”””)rnrnrn# Store all the generated embeddings.rnfor index, row in product_embeddings.iterrows():rn await conn.execute(“INSERT INTO product_embeddings VALUES ($1, $2, $3)” rn row[‘product_id’], rn row[‘content’], rn np.array(row[’embedding’]))’), (u’language’, u’lang-py’), (u’caption’, <wagtail.wagtailcore.rich_text.RichText object at 0x3e9b3eaaab90>)])]
Finding similar toys using pgvector cosine search operator
By completing the steps above, you’ve just made an entire toy dataset searchable using simple English! Check it out in the image below. You can even filter toys based on a specific price range, demonstrating the hybrid search capabilities.
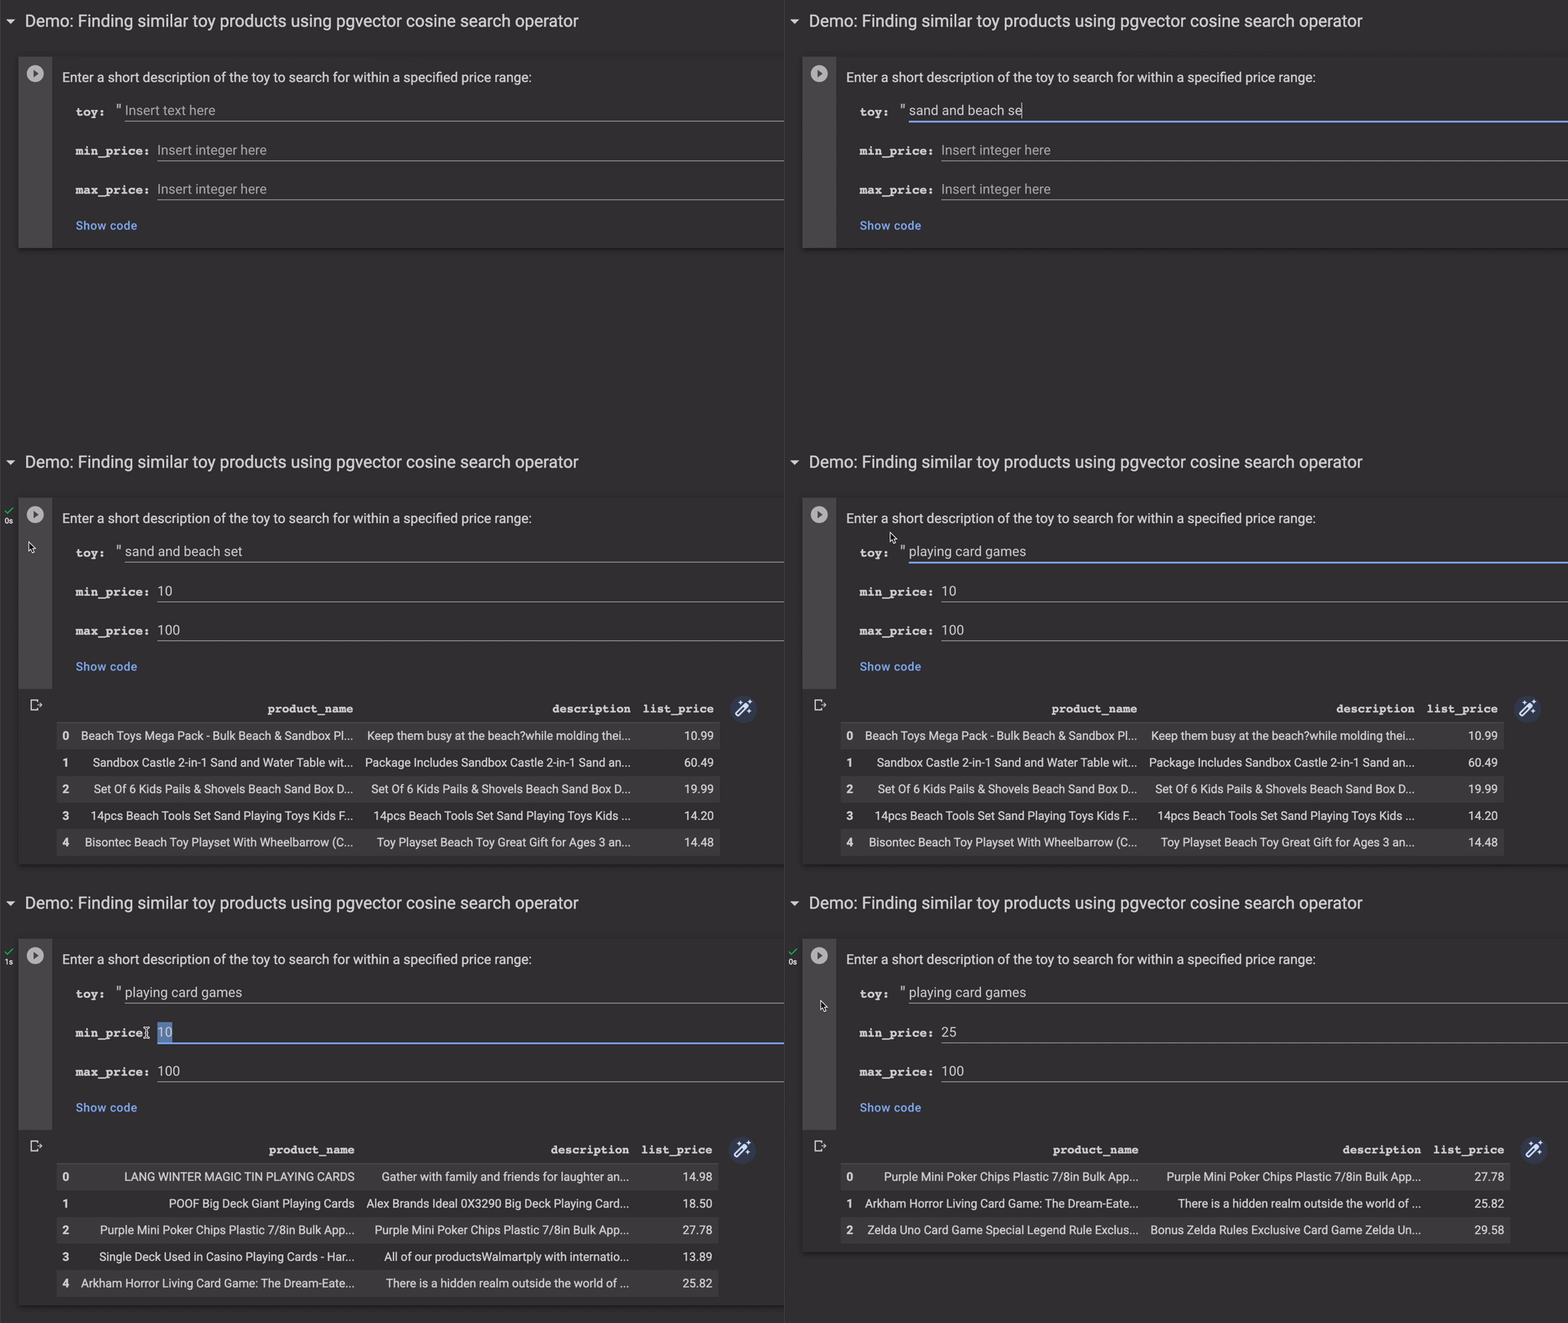
So, how does this work? Let’s break it down.
Step 1: Generate the vector embedding for the incoming input query.
- code_block
- [StructValue([(u’code’, u’# Generate vector embedding for the user query.rnfrom langchain.embeddings import VertexAIEmbeddingsrnembeddings_service = VertexAIEmbeddings()rnqe = embeddings_service.embed_query([user_query])’), (u’language’, u’lang-py’), (u’caption’, <wagtail.wagtailcore.rich_text.RichText object at 0x3e9b4c12ca10>)])]
Step 2: Use the new pgvector cosine similarity search operator to find related products
Notice how you can combine the vector search operation with the regular SQL filters on the `list_price` column using the powerful PostgreSQL and pgvector query semantics.
- code_block
- [StructValue([(u’code’, u’# Use cosine similarity search to find the top five products rn# that are most closely related to the input query.rnrnresults = await conn.fetch(“””rn WITH vector_matches AS (rn SELECT product_id, rn 1 – (embedding <=> $1) AS similarityrn FROM product_embeddingsrn WHERE 1 – (embedding <=> $1) > $2rn ORDER BY similarity DESCrn LIMIT $3rn )rn SELECT product_name, rn list_price, rn description rn FROM productsrn WHERE product_id IN (SELECT product_id FROM vector_matches)rn AND list_price >= $4 AND list_price <= $5rn “””, rn qe, similarity_threshold, num_matches, min_price, max_price)’), (u’language’, u’lang-py’), (u’caption’, <wagtail.wagtailcore.rich_text.RichText object at 0x3e9b4c12cad0>)])]
Use case 1: Building an AI-curated contextual hybrid search
Now that you’ve learned how to find similar toy products, it’s time to super-charge your application with AI. We will use large language models (LLMs) to make our application more intelligent and capable of answering user queries about these products.
The following example shows how a grandparent uses the AI-powered search interface to find a perfect toy for their grandkid by describing their needs in simple English!
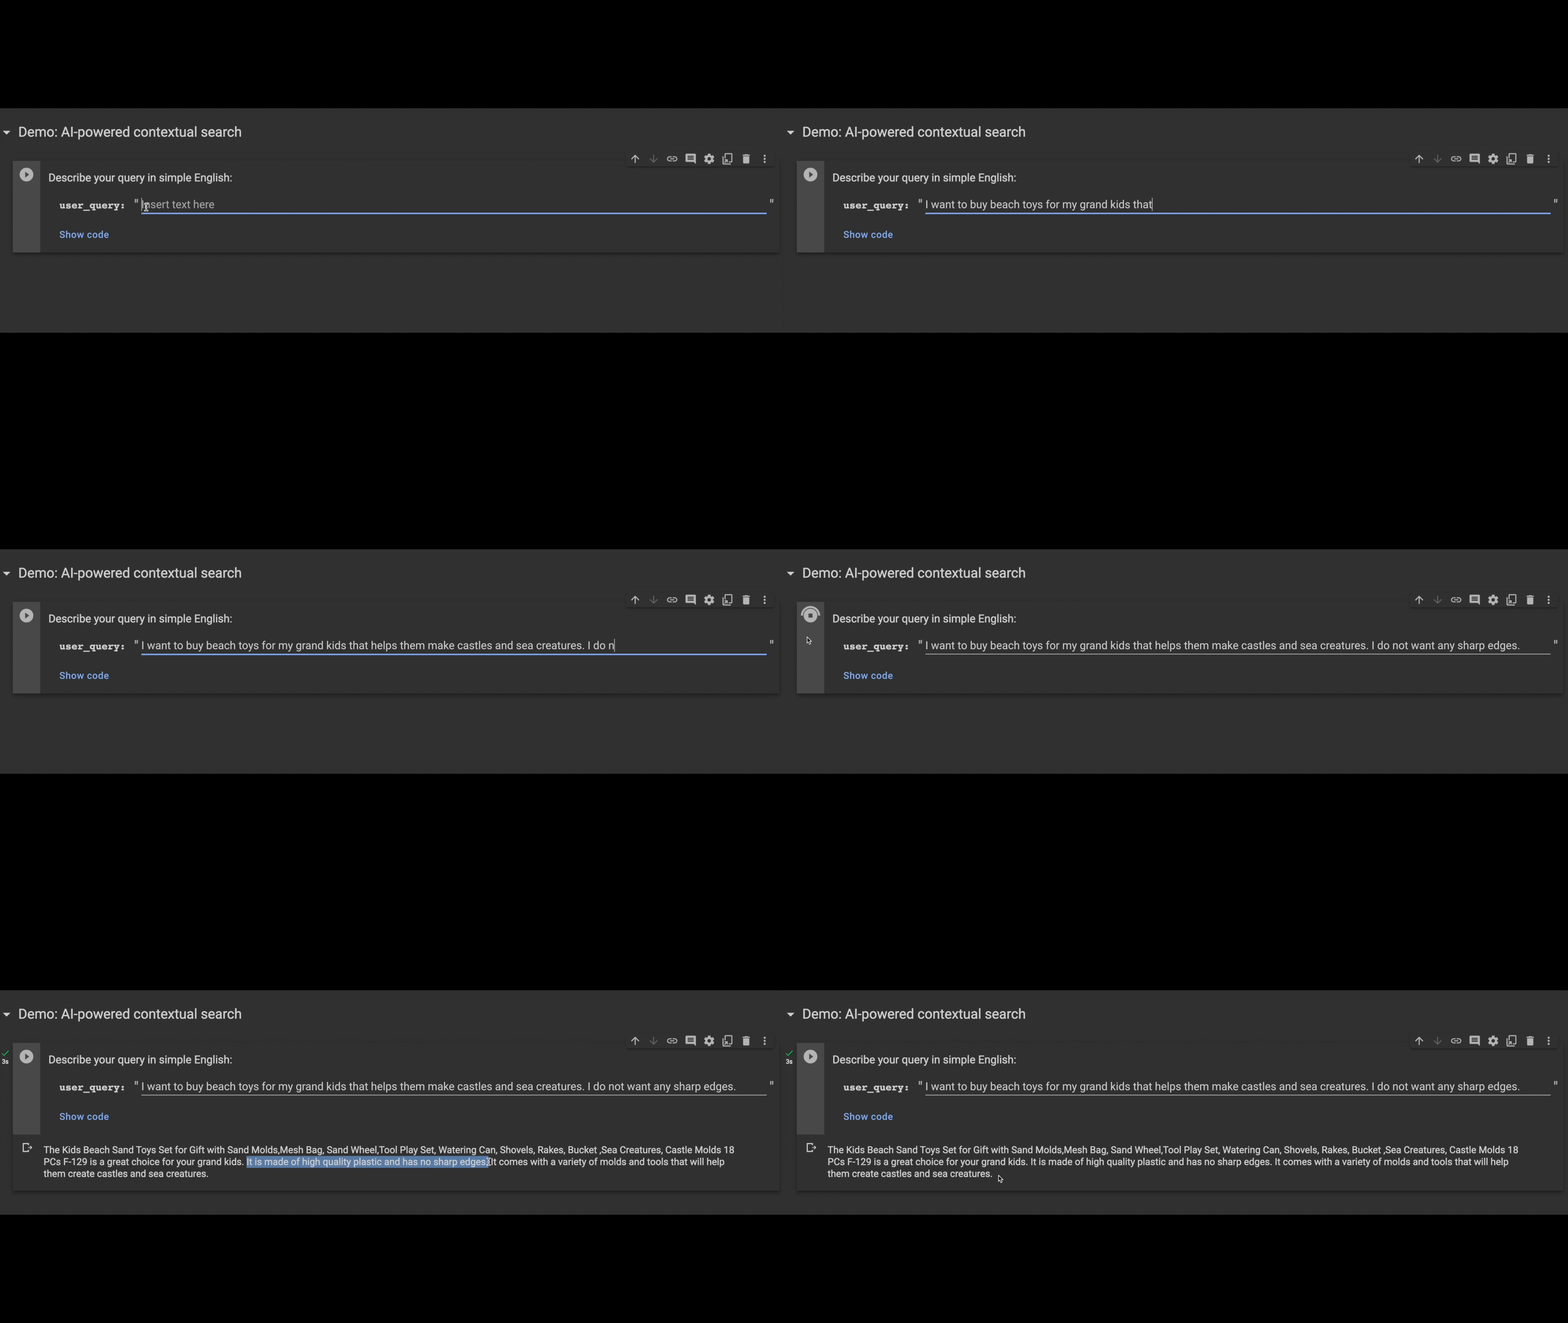
What is happening behind the scenes here?
- First, retrieve all the matching products and their descriptions using pgvector, following the same steps that we showed above.
- Then, use the MapReduce Chain from LangChain library to build a high-quality prompt context by combining summaries of all similar toy products.
- Finally, invoke the Vertex AI text generation LLM model to get a well-formatted answer. See the code snippet below for an example.
- code_block
- [StructValue([(u’code’, u’# Using LangChain for summarization and efficient context building.rnrnfrom langchain.chains.summarize import load_summarize_chainrnfrom langchain.docstore.document import Documentrnfrom langchain.llms import VertexAIrnfrom langchain import PromptTemplate, LLMChainrnfrom IPython.display import display, Markdownrnrnllm = VertexAI()rnrnmap_prompt_template = “””rn You will be given a detailed description of a toy product.rn This description is enclosed in triple backticks (“`).rn Using this description only, extract the name of the toy,rn the price of the toy and its features.rnrn “`{text}“`rn SUMMARY:rn “””rnmap_prompt = PromptTemplate(template=map_prompt_template, input_variables=[“text”])rnrncombine_prompt_template = “””rn You will be given a detailed description different toy productsrn enclosed in triple backticks (“`) and a question enclosed inrn double backticks(“).rn Select one toy that is most relevant to answer the question.rn Using that selected toy description, answer the followingrn question in as much detail as possible.rn You should only use the information in the description.rn Your answer should include the name of the toy, the price ofrn the toy and its features. rn Your answer should be less than 200 words.rn Your answer should be in Markdown in a numbered list format.rnrnrn Description:rn “`{text}“`rnrnrn Question:rn “{user_query}“rnrnrn Answer:rn “””rnrnrncombine_prompt = PromptTemplate(template=combine_prompt_template, input_variables=[“text”, “user_query”])rnrndocs = [Document(page_content=t) for t in matches]rnchain = load_summarize_chain(llm,rn chain_type=”map_reduce”,rn map_prompt=map_prompt,rn combine_prompt=combine_prompt)rnanswer = chain.run({rn ‘input_documents’: docs,rn ‘user_query’: user_query,rn })rnrnrndisplay(Markdown(answer))’), (u’language’, u’lang-py’), (u’caption’, <wagtail.wagtailcore.rich_text.RichText object at 0x3e9b4c12c1d0>)])]
Use case 2: Adding AI-powered creative content generation
Building a hybrid semantic search is a common, powerful example for using LLMs with vector embeddings. But there’s so much more you can do with this new technology!
You can create an AI-powered creative content generation tool by adjusting LLM prompt input and model temperature settings. Temperature is an input parameter for an LLM prompt that ranges from zero to one, and it defines the randomness of the model’s output. A higher temperature will result in more creative response, while a lower temperature will result in more definitive and factual output.
In the following example, you can see how a seller uses generative AI to get auto-generated item descriptions for a new bicycle product that they want to add to the platform!
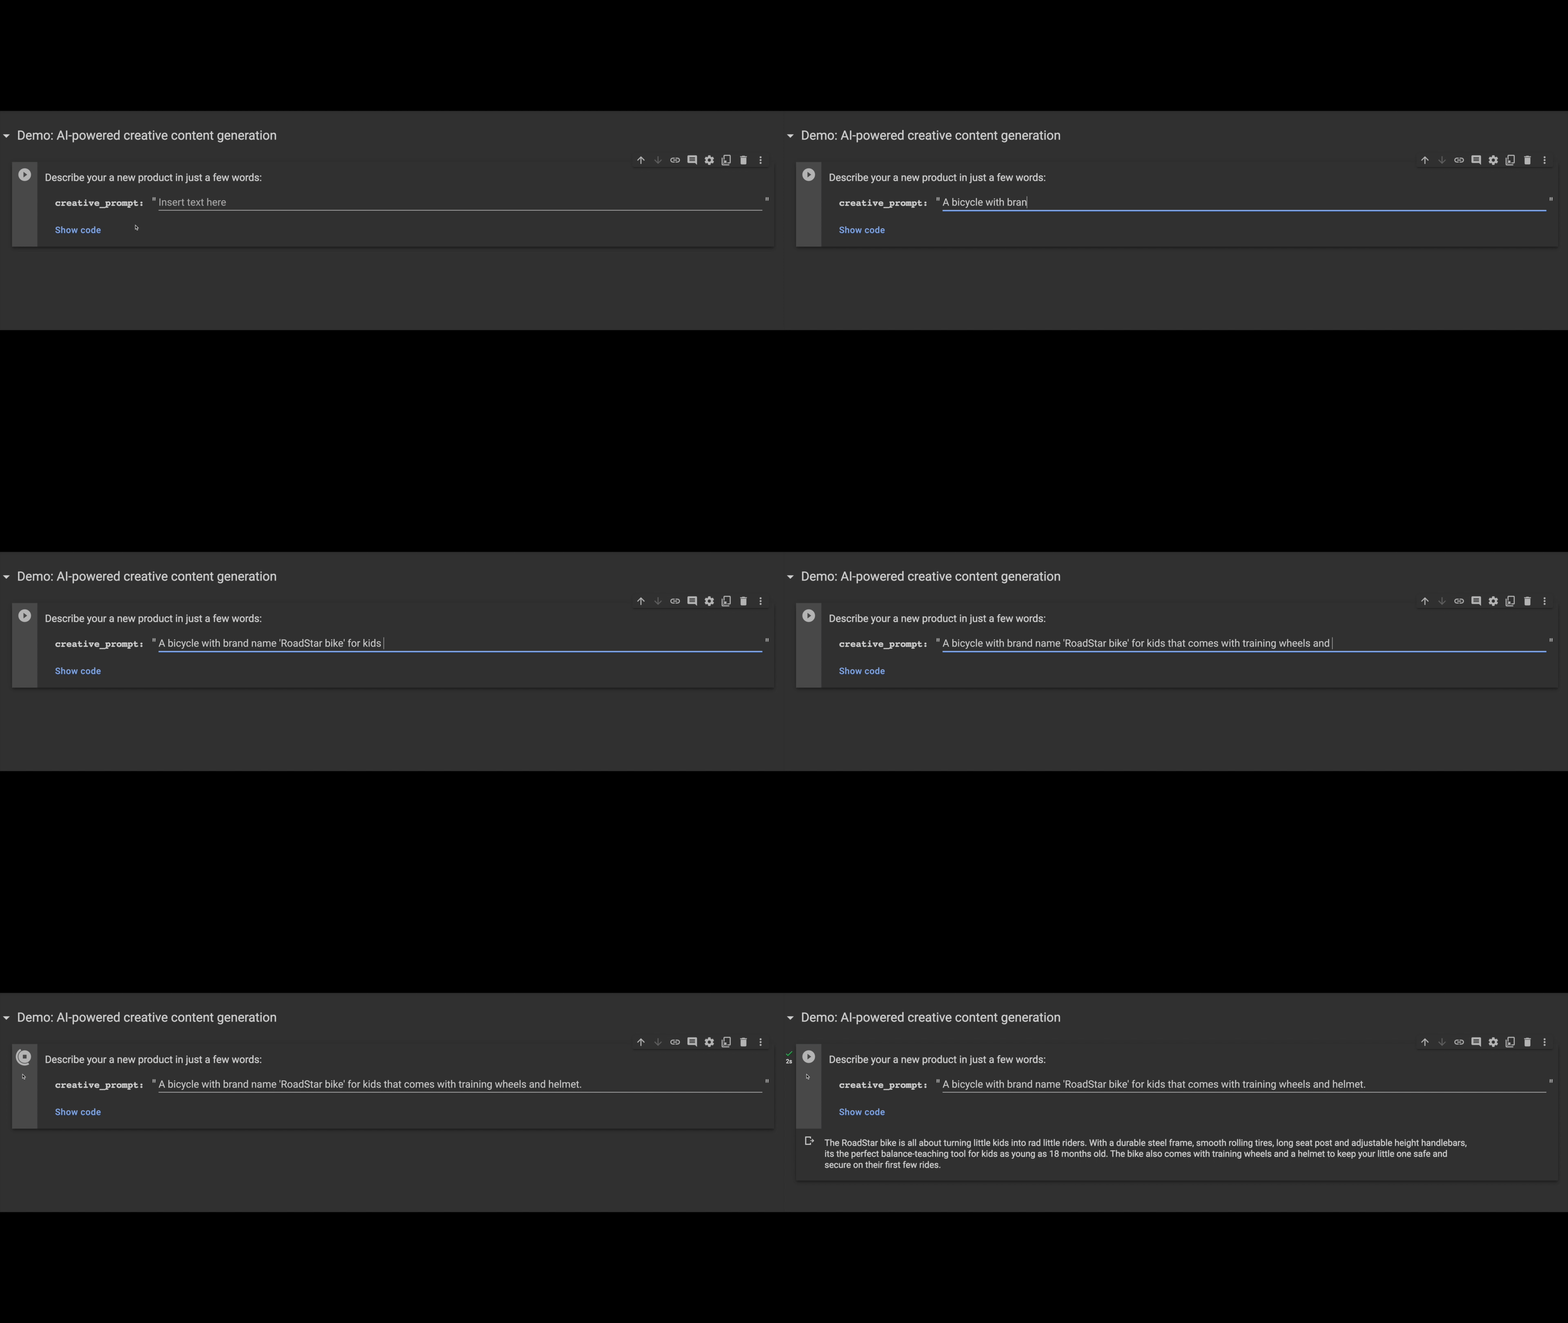
Like before, you can use the pgvector similarity search operator to find a similar product description, then use it as a prompt context to generate new creative output. Here is the LLM prompt code snippet that was used for the above output:
- code_block
- [StructValue([(u’code’, u’from langchain.llms import VertexAIrnfrom langchain import PromptTemplate, LLMChainrnfrom IPython.display import display, Markdownrnrntemplate = “””rn You are given descriptions about some similar kind of toys in thern context. This context is enclosed in triple backticks (“`).rn Combine these descriptions and adapt them to match the rn specifications in the initial prompt. rn All the information from the initial prompt must be included. rn You are allowed to be as creative as possible,rn Describe the new toy in as much detail. Your answer should bern less than 200 words.rnrn Context:rn “`{context}“`rnrn Initial Prompt:rn {creative_prompt}rnrn Answer:rn “””rnprompt = PromptTemplate(template=template, input_variables=[“context”, “creative_prompt”])rnrn# Increase the `temperature` to allow more creative writing freedom.rnllm = VertexAI(temperature=0.7)rnrnrnllm_chain = LLMChain(prompt=prompt, llm=llm)rnanswer = llm_chain.run({rn “context”: ‘\n’.join(matches),rn “creative_prompt”: creative_prompt,rn })rnrnrndisplay(Markdown(answer))’), (u’language’, u’lang-py’), (u’caption’, <wagtail.wagtailcore.rich_text.RichText object at 0x3e9b4c12c050>)])]
Summary
This blog demonstrated just two examples of powerful features that you can implement by combining the power of relational databases with LLMs.
Generative AI is a powerful paradigm shift in application development that lets you create novel applications to serve users in new ways — from answering patients’ complex medical questions to helping enterprises analyze cyberattacks. We’ve shown just one small example of what generative AI can unlock; we can’t wait to see what you build with it.
Try out the Google Colab notebook described in this blog to get started today!
Takeaway:
At NTSPL, we are at the forefront of revolutionizing AI applications on Google Cloud with cutting-edge technologies like pgvector, LLMs, and LangChain. Our expertise in harnessing these powerful tools empowers businesses to unlock the full potential of AI-driven solutions. From intelligent language processing to advanced recommendation systems, we pave the way for next-gen AI applications that deliver unparalleled performance and user experiences. Trust NTSPL as your innovation partner, and together, we shape the future of AI on Google Cloud, driving success and transformation for your business. Embrace the power of AI with NTSPL, and watch your ideas become extraordinary realities.


